DirectX 11 enables High-definition and 3D games can be made using this technology. DirectX 11 allows developers to create & Play more detailed and realistic games.
DirectX 11
It is the new version compared to the older one. It is used to create and play high-quality games and to do other graphics tasks. It provides gamers and developers with many advanced features and tools. It also supports shaders to enhance graphics effects. This technology helps games run smoother by using the power of multiple CPU cores at the same time. It works well on many different computers and graphics cards. It helps for better visuals and faster performance in gaming and other graphic applications.
Key Features
Tessellation helps to create very detailed 3D models
Shader Model 5.0 – lighting, shadows, and visual effects
Multisample Anti-aliasing Enhances image quality
How to use DirectX 11?
It has all the important tools needed to make cool 3D games and application development. It helps programmers with detailed shapes, lights, shadows, and special effects. With this, game makers can make games run fast and look nice by using the computer’s graphics card and processor in a smart way. Here are the steps to use it:-
DirectX versions
Version 1 (1995)
This was the first version made to help games run better on Windows 95. Before this, many games had to run through DOS, which didn’t work well with Windows. It gave game developers tools to show 2D graphics, play sound effects and music, and use game controllers. It made game development on Windows much easier and allowed games to run more smoothly on modern PCs.
Version 2 (1996)
It didn’t add a lot of new things, but it improved the tools that were already there. It made 2D and early 3D graphics run more efficiently. This helped developers slowly move from simple flat graphics to more basic 3D. It also fixed some bugs from the first version and made things more stable for developers and gamers.
Version 3 (1996)
This version was a big upgrade. It supports games that show 3D graphics much better. Now, games could have moving 3D characters and worlds with more depth. It also added support for controllers with vibration, so players could feel actions like crashes or hits during gameplay. This made games feel more real and fun to play.
Version 5 (1997)
It brought a lot of new features for 3D graphics. It improved lighting and added better support for textures, images placed on 3D objects to make them look realistic. It also supported MMX technology, which was a special feature in some CPUs that helped games run faster. Many popular games from the late ‘90s used it to create better-looking environments.
Version 6 (1998)
This version made games look even more realistic. It allowed the graphics card to help with drawing 3D objects. This meant the computer’s main processor, CPU, didn’t have to do all the work, so games could run faster and look better. It also improved textures on objects, making everything clearer.
Version 7 (1999)
It built on what version 6 started. It improved the way the graphics card handled 3D graphics and added better support for using the video memory more efficiently. This allowed games to show more detailed worlds, bigger levels, and smoother animations. It also gave better support for 3D sound and advanced input devices, making the gaming experience more realistic.
Version 8 (2000)
This was a major update. It combined the tools for 2D and 3D into one, making development easier. It introduced programmable shaders. These let developers write special instructions for how things like lights, water, smoke, and reflections should look. This meant games could now show cooler effects and more realistic environments, making a big difference in how games looked and felt.
Version 9 (2002)

It took shaders’ effect even further by adding Shader Model 2.0 and later 3.0. These gave developers more control over graphics, allowing even more complex and beautiful effects. It also improved colour detail and lighting accuracy using floating-point precision. Many of the most popular games from the early 2000s used it.
| File Name | DirectX 9.zip |
| Version | 9 |
| Size | 85 mb |
| Upadted | 5 days ago |
Version 10 (2006)
This version only worked on Windows Vista and newer systems. It changed the way computer works with graphics cards, using a new system that was faster and more efficient. It introduced Shader Model 4.0 and geometry shaders, which let developers build more detailed shapes and effects. This made everything from characters to landscapes look more complex and real.
| File Name | DirectX 10.zip |
| Version | 9 |
| Size | 85 mb |
| Upadted | 5 days ago |
DirectX11.org (Version 11 – 2009)
It added a lot of exciting new features. It introduced tessellation, which lets developers add more detail to objects by breaking them into smaller pieces, making round or uneven shapes look much smoother. It also included compute shaders, which let the graphics card help with things like physics, AI, and other background tasks. Plus, it supported multi-core CPUs better, helping games run faster and handle more things at once.
| File Name | DirectX11.zip |
| Version | 9 |
| Size | 85 mb |
| Upadted | 5 days ago |
DirectX12.com (Version 12 – 2015)
It gave developers much more control over how their games use the computer’s hardware. It reduced the extra work the CPU had to do and allowed games to make better use of all processor cores. Games could run faster and look even better. It also added support for ray tracing, a feature that makes lighting, shadows, and reflections look almost like real life. Many modern games use it for high-end graphics.
| File Name | DirectX12.zip |
| Version | 9 |
| Size | 85 mb |
| Upadted | 5 days ago |
Install DirectX 11
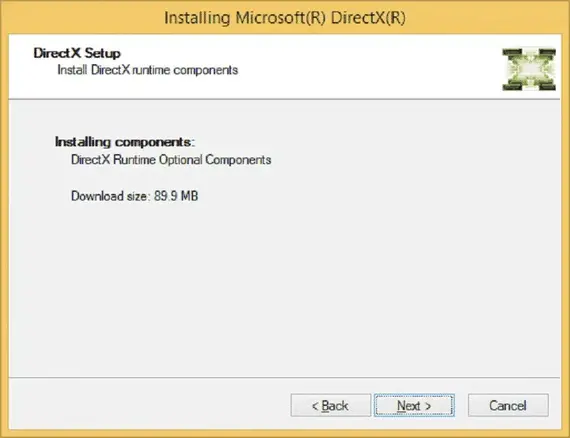
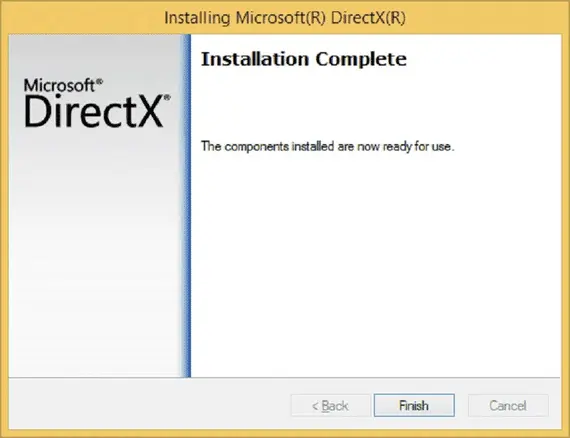
Download DirectX 11
- Visit our website and go to the DirectX 11 page.
- Click the download button to get the installer file.
- When the download is finished, open the installer file.
- Follow the instructions on the screen to install it.
- Restart your PC.
- After restarting, it will be ready to use.
- You can now run games or apps that need it, and you can also develop high-quality games.
DirectX 11 System Requirements
- Operating System: Windows 7, Windows 8, Windows 10, or higher
- Processor: 1 GHz
- RAM: 1 GB
- Graphics Card: DirectX 11 compatible GPU
Tips to use DirectX 11
Troubleshoots
- Game crashes: Update your graphics card driver, reinstall it, and try opening the game as an admin.
- Game is slow: Close other apps, lower game graphics, and make sure your drivers are up to date.
- DirectX 11 not found: Go to the game settings and choose it if it’s not selected.
- Graphics look weird: Update your graphics drivers, don’t use overclocking, and restart the game.
- Black screen: Use windowed mode, change the screen size in the game files, and update your drivers.
- Error message: Lower game graphics, update your drivers, and stop using heavy effects.
- Shader not working: Check your shader code for mistakes and make sure it matches your game model setup.
- Game lags: Turn off big effects like shadows or fancy lighting to make it run faster.
- Textures or models not loading: Check if the file names and paths are correct and supported by the game.
- Debug tools not working: Use tools like Visual Studio or PIX and turn on the debug option in your code.
Conclusion
It is a tool that helps make games look better and run faster. Developers can build cool, 3D games with nice graphics, lighting, and effects. It works on most Windows computers and uses the full power of the computer to make games smoother. Players get better games, and developers can create more fun and detailed games on it. It’s a great choice for anyone who wants to play or make good-quality games.